 User Interface
The PDF-Tools user interface has two workplaces: the Main window and the Edit window:
Main Window
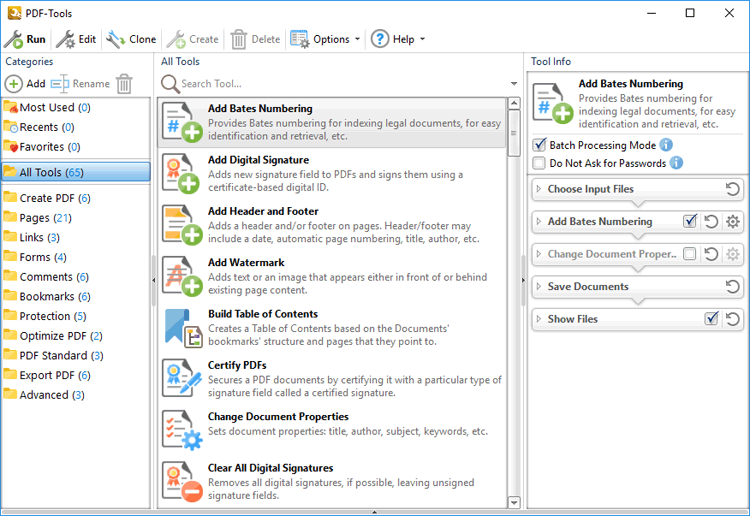
Figure 1. Main Window
The Main window is used to view, select, edit, clone and launch tools:
•Click tool Categories to view the tools that they contain, which will display in the main window. The tools in the Create PDF category are displayed in (figure 1), and the other tool categories are detailed below.
•The Tool Info pane displays the name, description, optional settings and actions of selected tools, and contains the following settings:
•The Batch Processing Mode setting determines the processing method in cases of multiple input files. It is enabled by default, which means files are processed simultaneously. Clear the Batch Processing Mode box to process input files one at a time instead. Disabling this option should reduce memory usage, but it may also result in unexpected output for tools that combine input files into single documents.
•The Do Not Ask for Passwords setting is disabled by default. This means that PDF-Tools will prompt for passwords in cases of password-protected input files that do not have corresponding passwords in Predefined Passwords Storage. Enable this option to skip these files when tools run.
•Click the dropdown arrows in the Tool Info pane to customize tool action parameters. These parameters are detailed in the Actions Library. Click the circular reset arrow to reset tool action parameters to their default values.
•Select/clear tool action check boxes (where possible) to include/exclude them when the tool runs.
•Click ![]() Add to add a custom category to the list of categories. Click and drag tools to add them to custom categories. Note that default tools cannot be moved from their home categories.
Add to add a custom category to the list of categories. Click and drag tools to add them to custom categories. Note that default tools cannot be moved from their home categories.
•Click ![]() Rename or
Rename or ![]() Remove to rename/remove custom categories.
Remove to rename/remove custom categories.
•Use the ![]() Search Tool to search for tools.
Search Tool to search for tools.
•Click ![]() Run (or double-click) to launch the selected tool.
Run (or double-click) to launch the selected tool.
•Click ![]() Edit to edit the selected tool, as detailed in (figure 6).
Edit to edit the selected tool, as detailed in (figure 6).
•Click ![]() Clone to create a clone of the selected tool, which enables the full customization of its actions/parameters, as detailed here.
Clone to create a clone of the selected tool, which enables the full customization of its actions/parameters, as detailed here.
•Click ![]() Create to create a new tool, as detailed here.
Create to create a new tool, as detailed here.
•Click ![]() Delete to remove the selected tool. Note that this option is available only for custom tools.
Delete to remove the selected tool. Note that this option is available only for custom tools.
•Click ![]() Options to view program options:
Options to view program options:
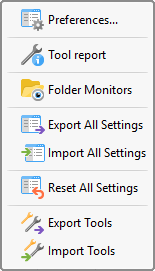
Figure 2. Options Tab
•Click Preferences to view/edit the preferences of PDF-Tools, as detailed here.
•Click Tool Report to enable/disable the Tool Report pane, which details a breakdown of operations when tools run.
•Click Folder Monitors to view/edit folder monitors, which are used to watch user-specified folders and automatically perform tool operations on files moved into them. Folder monitors are detailed here.
•Click Export All Settings to export the current tool settings and custom tools to file. This is a useful feature in cases where several parties require the same settings, such as employees of the same organization.
•Click Import All Settings to import settings that the Export All Settings feature has been used to export.
•Click Reset All Settings to reset all settings and remove all custom tools.
•Click Export Tools to export a selection of tools to file.
•Click Import Tools to import tools that the Export Tools feature has been used to export.
•Click ![]() Help to view help options:
Help to view help options:
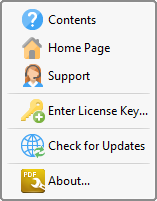
Figure 3. Help Tab
•Click Contents to navigate to the online help manual.
•Click Home Page to navigate to the PDF-Tools page on the PDF-XChange website.
•Click Support to navigate to the PDF-XChange support forums.
•Click Enter License Key to view/edit license keys for PDF-Tools, as detailed here.
•Click Check for Updates to launch the PDF-XChange Updater and check for updates to all PDF-XChange applications installed on the local computer.
•Click About to view license/version information, and further details about PDF-Tools.
Right-click tools for additional options:
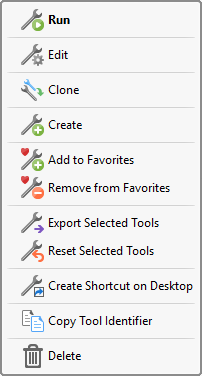
Figure 4. Tool Options Menu
•Click Run (or double-click) to launch the selected tool.
•Click Edit to edit the selected tool, as detailed in (figure 6).
•Click Clone to create a clone of the selected tool, which enables the full customization of its actions/parameters, as detailed here.
•Click Create to create a new tool, as detailed here.
•Click Add to Favorites to add tools to the Favorites category.
•Click Remove from Favorites to remove tools from the Favorites category.
•Click Export Selected Tools to export tools. The Save Export File dialog box will open. Select a name and location for the file. Tools will be saved as a .pdtex file. The Import Tools option detailed above can be used to import these files.
•Click Reset Selected Tools to revert the settings of selected tools to their default values.
•Click Create Shortcut on Desktop to create a desktop shortcut for tools. A shortcut icon will appear on the desktop when this feature is used. Double-click icons, or drag and drop files onto them, in order to launch the associated tool.
•Click Copy Tool Identifier to copy the unique tool identifier to the clipboard for the selected tool. Tool identifiers are used in conjunction with the /RunTool command line in order to run tools from the command prompt.
•Click Delete to delete tools. Note that this option is not available for default tools.
Tool Categories
PDF-Tools contains the following default tool categories:
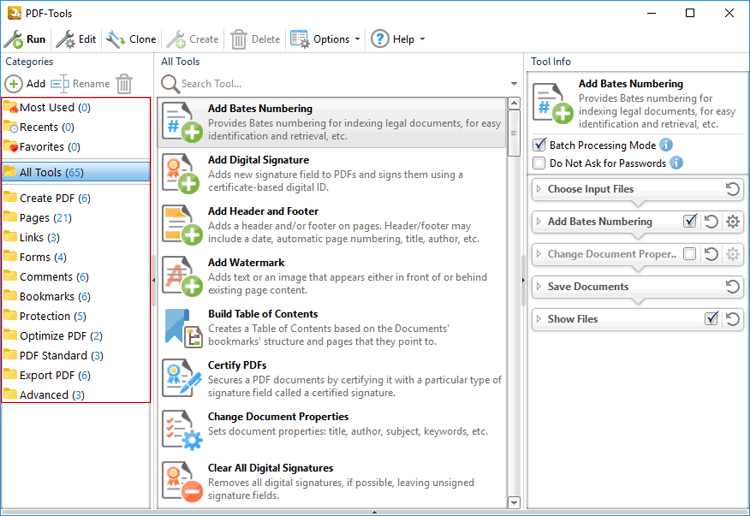
Figure 5. Default Tool Categories
•The Most Used category contains the five most-often used tools.
•The Recents category contains the ten most recently used tools.
•The Favorites category contains the favorite tools of the user. Drag tools to add them to this folder. Alternatively, click the heart in the upper-left of the tool pane to add/remove tools to/from the Favorites category. The Add Bates Numbering tool has been added to the Favorites category in (figure 4).
•All Tools contains all sixty-five default tools, which are detailed here.
•Create PDF contains the tools used to create PDF files. These tools are detailed here.
•Pages contains the tools used to edit, update and delete document pages. These tools are detailed here.
•Links contains the tools used to create/delete links and weblinks. These tools are detailed here.
•Forms contains the tools used to import/export, delete or reset forms and form data. These tools are detailed here.
•Comments contains the tools used to manipulate document comments such as weblinks and form fields. These tools are detailed here.
•Bookmarks contains the tools used to create and manipulate document bookmarks. These tools are detailed here.
•Protection contains the tools used to protect and secure documents. These tools are detailed here.
•Optimize PDF contains the tools used to optimize and enhance documents. These tools are detailed here.
•PDF Standard contains the tools used to add/remove PDF subset compliance to PDF documents, such as the PDF/A and PDF/X formats. These tools are detailed here.
•Export PDF contains the tools used to export copies of PDF documents to different output formats, such as plain text, image format and MS Word/Excel/Powerpoint. (Note that files exported to (*.docx) format are compatible with MS Word 2010 and later). These tools are detailed here.
•Advanced contains the tools used to perform more advanced operations, such as changing document properties and emailing documents. These tools are detailed here.
Edit Window
Right-click tools and then click Edit to view the Edit window for the tool. The Edit window is used to view and customize tool functions. For example, the Edit window for the Convert Files to PDFs tool is detailed below:
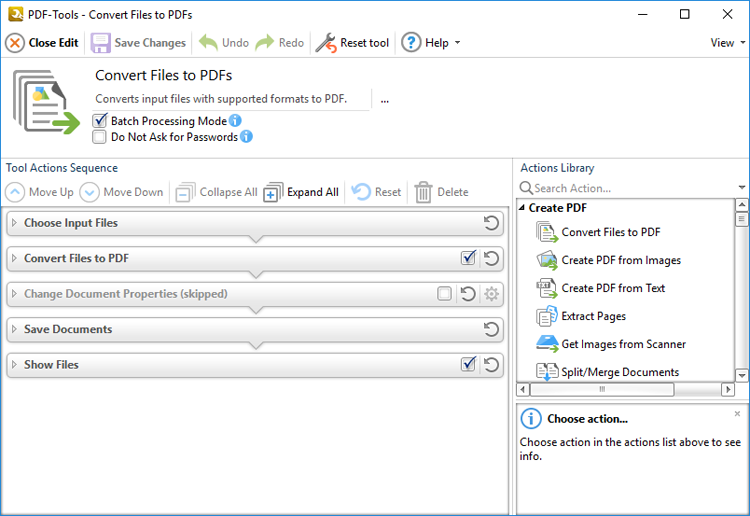
Figure 6. Edit Window, Convert Files to PDFs
The name, icon and description of the selected tool is displayed in the Edit window. These parameters can be edited for cloned/custom tools. All tools feature actions that can be adjusted to meet specific requirements. These actions are contained in the Tool Actions Sequence. The order of actions in the Tool Actions Sequence determines the order of actions when tools run, and can be reordered in cloned/custom tools. Click the arrow icons on the left side of actions to expand their parameters, which can then be customized, as detailed in the the Actions Library. Use the icons in the Edit window to perform the following operations:
Click ![]() Close Edit to close the editing session.
Close Edit to close the editing session.
Click ![]() Save Changes to save changes made to the tool.
Save Changes to save changes made to the tool.
Click ![]() Undo to undo the most recent editing action.
Undo to undo the most recent editing action.
Click ![]() Redo to redo the most recent undo action.
Redo to redo the most recent undo action.
Click ![]() Reset Tool to reset all tool settings.
Reset Tool to reset all tool settings.
Click ![]() Move Up to move the selected action up in the Tool Actions Sequence.
Move Up to move the selected action up in the Tool Actions Sequence.
Click ![]() Move Down to move the selected action down in the Tool Actions Sequence.
Move Down to move the selected action down in the Tool Actions Sequence.
Click ![]() Collapse All to collapse all actions in the Tool Actions Sequence.
Collapse All to collapse all actions in the Tool Actions Sequence.
Click ![]() Expand All to expand all actions in the Tool Actions Sequence.
Expand All to expand all actions in the Tool Actions Sequence.
Click ![]() Reset to reset the selected action options in the Tool Actions Sequence.
Reset to reset the selected action options in the Tool Actions Sequence.
Click ![]() Delete to delete selected actions.
Delete to delete selected actions.
Select/clear ![]() boxes to include/exclude actions when tools run.
boxes to include/exclude actions when tools run.
Click ![]() Reset to reset action options to their default values.
Reset to reset action options to their default values.