 MSOffice Toolbar Add-in
The MSOffice Toolbar Add-in installs with PDF-XChange Standard and displays in MS Word, Excel and PowerPoint toolbars. This means that different print settings can be determined for these applications as desired and avoids the need to continually change settings when documents are printed from different applications. Click the PDF-XChange tab to view options:
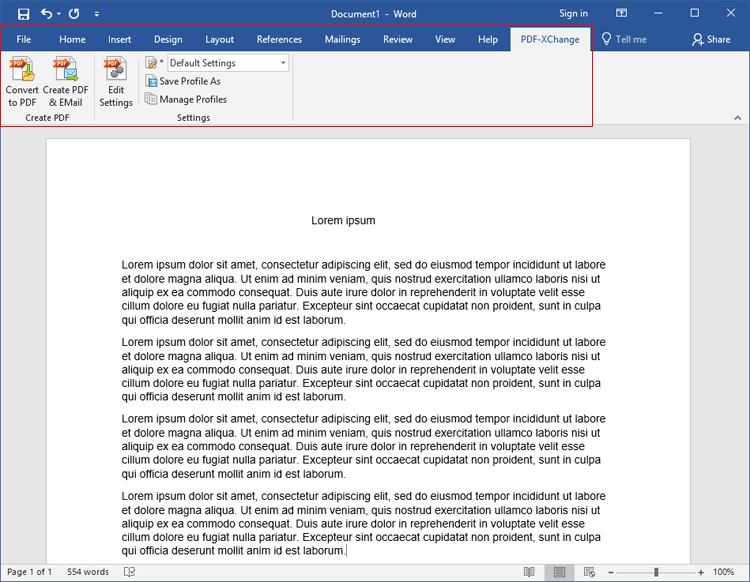
Figure 1. MSOffice Toolbar Add-in Options, MS Word
•Click Convert to PDF to convert the active document to PDF.
•Click Create PDF & Email to convert the active document to PDF and email it via the e-Mail settings.
•Click Edit Settings to view/edit the PDF-XChange Standard settings, as detailed below.
•Use the dropdown menu to determine the printing profile used to print documents, as detailed here.
•Click Save Profile As to save the current settings to a new profile, as detailed here.
•Click Manage Profiles to manage existing profiles, as detailed here.
Settings
Click Edit Settings to edit the print settings for the current MS Office application. The PDF-XChange Settings dialog box will open. Available settings can be divided into two sections - those that all MS Office applications share, and application-specific settings. All options are detailed below. Note that changes made to settings will determine the output for only documents from the application through which the MSOffice Toolbar Add-in was accessed. Additionally, the commands in the MSOffice Toolbar Add-in, as detailed in and below (figure 1), must be used in order for these settings to be utilized. If the option to print is selected from the File menu instead, for example, then the Windows settings for PDF-XChange will be used.
Shared Settings
The shared settings are the same in the MS Office Toolbar for all MS Office applications:
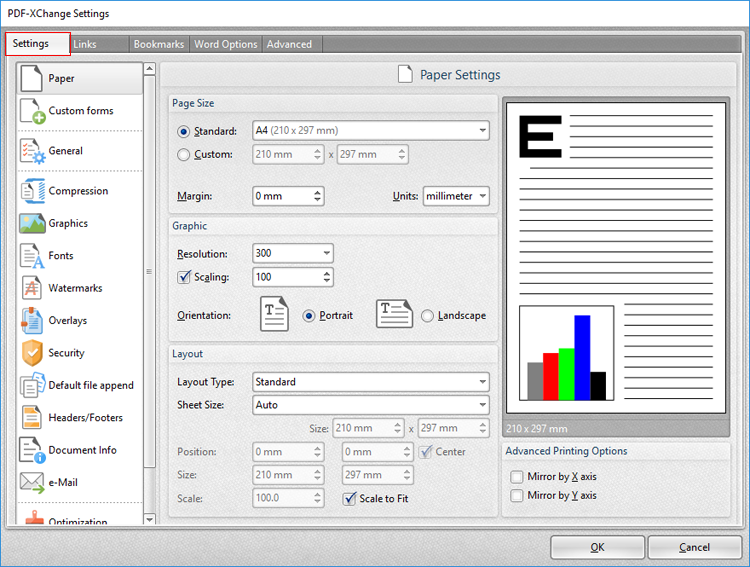
Figure 2. PDF-XChange Settings Dialog Box, Settings Tab
These settings are used to determine printing parameters, as detailed in the earlier sections of this manual.
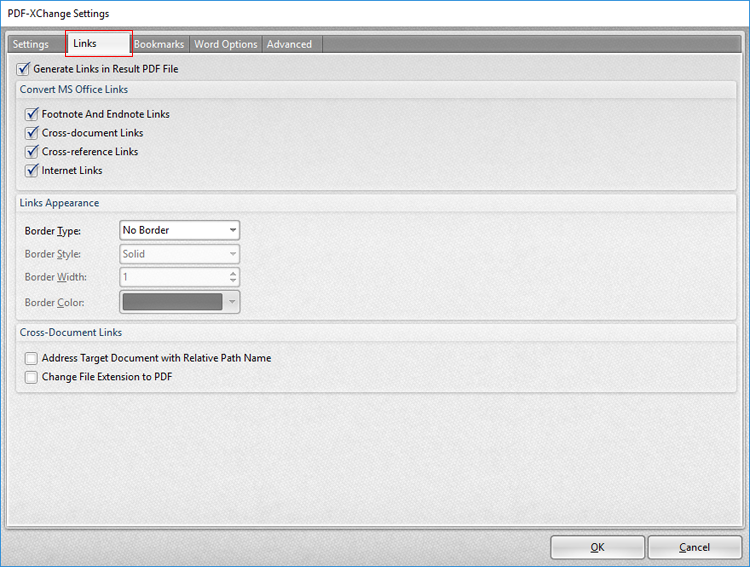
Figure 3. PDF-XChange Settings Dialog Box, Links Tab
The Links settings are used to determine options for links in printed documents:
•Select/clear the Generate Links in Result PDF File box to enable/disable links in printed documents.
•Use the Convert MS Office Links check boxes to enable/disable link conversion for the associated link formats.
•Use the Links Appearance dropdown menus to determine style options for links.
•Select the Address Target Document with Relative Path Name box to convert fully-qualified path name links into path names that are relative to the active document. This is a useful feature if documents are maintained in a folder hierarchy.
•Select the Change File Extension to PDF box to change the existing file extension to (*.pdf). This is a useful feature if the current document points to other documents that will also be converted to PDF format.
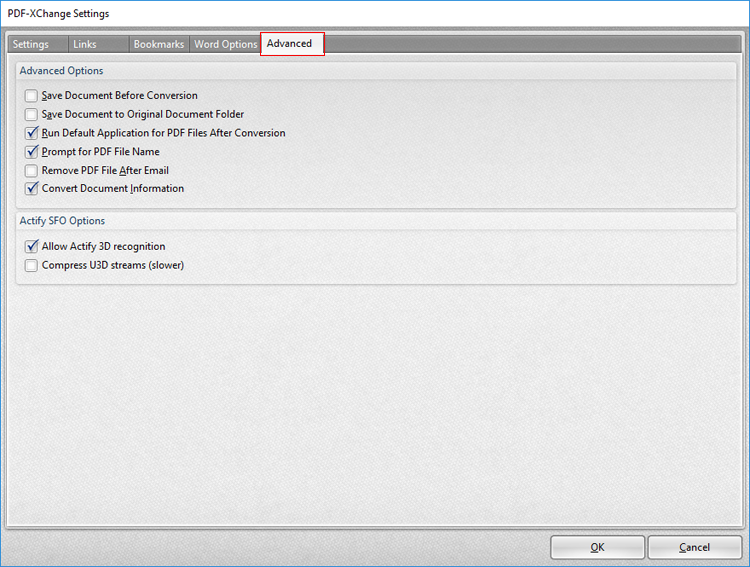
Figure 4. PDF-XChange Settings Dialog Box, Advanced Tab
The Advanced settings are used to determine advanced options for printed documents:
•Select the Save Document Before Conversion box to save documents before conversion to PDF.
•Select the Save Document to Original Document Folder box to save converted documents in their source folder.
•Select the Run Default Application for PDF Files After Conversion box to launch the default PDF viewer after file conversion.
•Select the Prompt for PDF File Name box to launch the save file dialog box to name files when documents are printed. If this option is disabled then the name of the source file is used.
•Select the Remove PDF File after Email box to remove PDF files that have been printed and emailed.
•Select the Convert Document Information box to include document properties from source files in printed files.
The Actify SFO Options are as follows:
•Select the Allow Actify 3D Recognition box to allow PDF-XChange Standard to recognize and encode Actify-based 3D graphics.
•Select the Compress U3D output box to compress Universal 3D files, which reduces the size of files but may take longer to process.
Application-Specific Settings
MS Word, Excel and PowerPoint each feature an application-specific tab in the MS Office Toolbar Add-in. These settings determine output options for their respective applications:
MS Excel Options
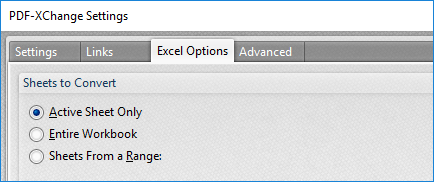
Figure 5. MS Excel Options
•Select the Active Sheet Only box to convert only the active sheet to PDF.
•Select the Entire Workbook box to convert the entire workbook to PDF.
•Select the Sheets From a Range box to convert sheets from a custom range. Two number boxes will open when this option is selected. Enter the first and last page of the desired range.
MS PowerPoint Options
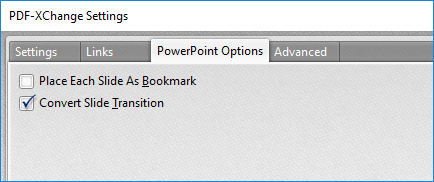
Figure 6. MS PowerPoint Options
•Select the Place Each Slide As Bookmark box to create a bookmark from each slide in the project.
•Select the Convert Slide Transition box to convert the transition slides in printed files.
MS Word Options
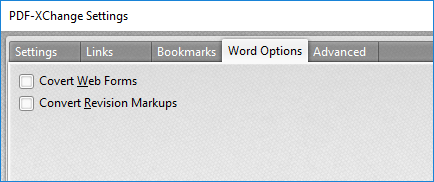
Figure 7. MS Word Options
•Select the Convert Web Forms box to include web forms in the conversion to PDF.
•Select the Convert Revision Markups box to include revision markups in the conversion to PDF.
Note that the Bookmarks tab is also available in the MSOffice Toolbar Add-in for MS Word:
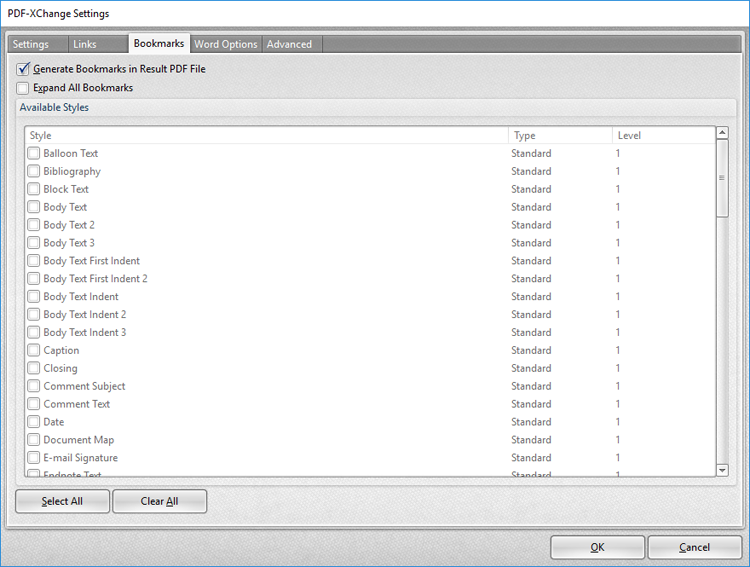
Figure 8. MS Word Toolbar Add-in, Bookmarks Tab
•Select the Generate Bookmarks in Result PDF File to generate bookmarks in printed files.
•Select the Expand All Bookmarks box to expand all created bookmarks in printed files.
•Select styles in the Available Styles pane to determine the style of bookmarks.
Click OK to save changes.