 Explore the User Interface
The PDF-XChange Editor user interface appears as below:
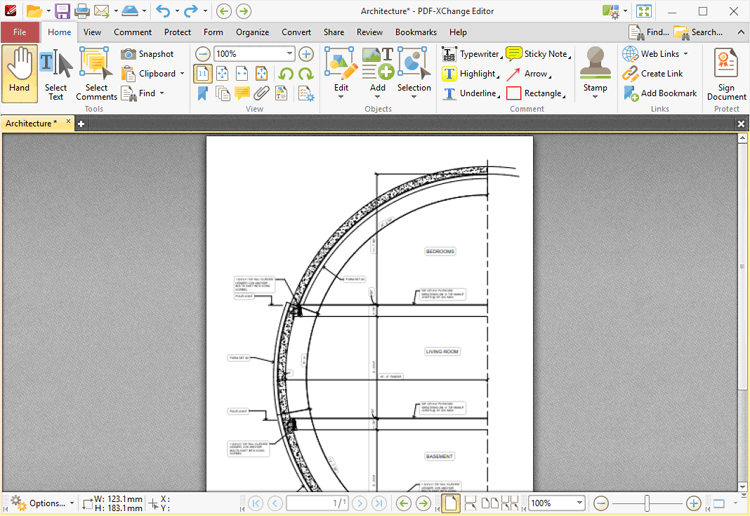
Figure 1. PDF X-Change Editor User Interface
The ribbon tabs are located at the top of the window:
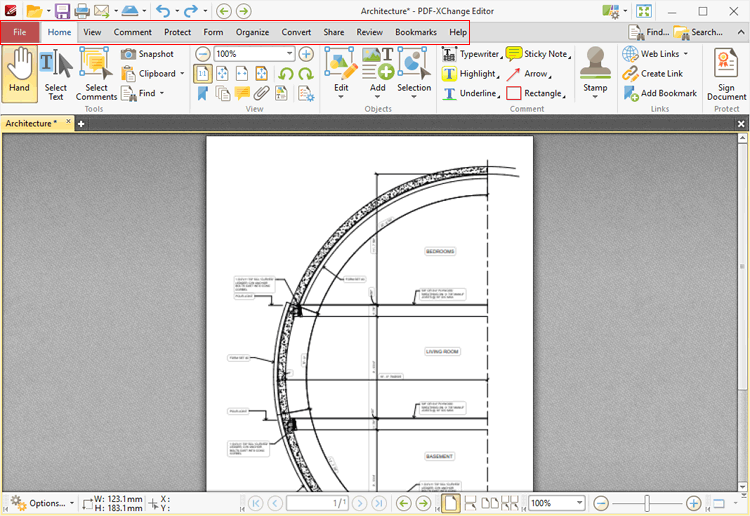
Figure 2. PDF X-Change Editor User Interface, Ribbon Tabs Highlighted
Click the links below to view the options and functionality of each tab:
•File contains file-level operations such as open, close, save and print.
•Home contains the most commonly-used commands, such as the basic tools, links to editing panes, view and rotation options, content-editing features, annotation tools and document signing options.
•View contains options that determine what is displayed in the main window such as toolbar shortcuts and editing panes. Document layout options are also available in this tab.
•Comment contains options for editing document comments, such as converting comments to base content, importing/exporting comments and creating a comment summary.
•Protect contains options for signing and certifying documents, creating/editing security policies and redacting documents.
•Form contains options for managing, highlighting and creating document form fields such as radio buttons, dropdown menus and barcodes.
•Organize contains options for editing documents, such as add/remove watermarks, insert/delete/crop/resize pages, edit backgrounds, add headers and footers/Bates numbering.
•Convert contains options for creating documents from the local scanner, combining existing files into a new file, creating blank documents, performing OCR on documents and converting PDF files to other formats such as MS Word, Excel and Powerpoint formats. Note that files exported to (*.docx) format are compatible with MS Word 2010 and later.
•Share contains options that relate to files associated with the Microsoft Office SharePoint Server, such as checking documents in/out or discarding documents from Sharepoint, and also contains an option for emailing documents from PDF-XChange Editor.
•Review contains options for reviewing documents, such as the spell check and word count features, as well as options to create/delete and manipulate document comments.
•Bookmarks contains options that relate the creation and management of document bookmarks.
•Help contains links to software assistance, such as the PDF-XChange website and user forum, and customizable options for the UI theme and toolbars.
Note that the layout and content of the ribbon tabs can be fully customized, as detailed here.
The Quick Access Toolbar is located in the upper left of the user interface:
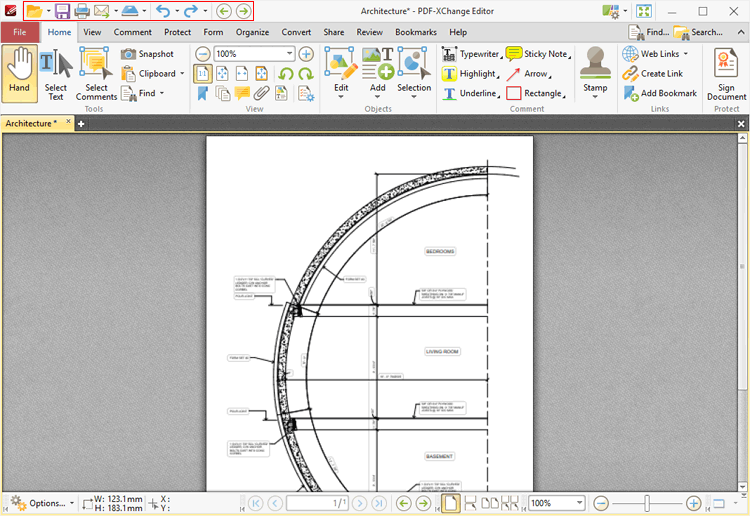
Figure 3. PDF X-Change Editor User Interface, Quick Access Toolbar Highlighted
Use the icons in this toolbar to perform the following operations:
Click ![]() Open to open files, or click the dropdown arrow to view/select recent files, including pinned recents, as detailed here.
Open to open files, or click the dropdown arrow to view/select recent files, including pinned recents, as detailed here.
Click ![]() Save to save files. Note that additional save options, such as Save As and Save as Optimized, are available in the File tab.
Save to save files. Note that additional save options, such as Save As and Save as Optimized, are available in the File tab.
Click ![]() Print to print files. The Print dialog box will open and can be used to customize print settings, as detailed here.
Print to print files. The Print dialog box will open and can be used to customize print settings, as detailed here.
Click ![]() Email to email files, or click the dropdown arrow to view/manage available mail clients, as determined in the Send Mail preferences.
Email to email files, or click the dropdown arrow to view/manage available mail clients, as determined in the Send Mail preferences.
Click ![]() Scan to scan documents into PDF-XChange Editor, or click the dropdown arrow to select a preset scanning mode. The Scan Properties dialog box will open and can be used to customize scan settings, as detailed here. Scanned documents will be converted to PDF and displayed in the main window.
Scan to scan documents into PDF-XChange Editor, or click the dropdown arrow to select a preset scanning mode. The Scan Properties dialog box will open and can be used to customize scan settings, as detailed here. Scanned documents will be converted to PDF and displayed in the main window.
Click ![]() Undo to undo the most recent action.
Undo to undo the most recent action.
Click ![]() Redo to reverse the most recent undo action.
Redo to reverse the most recent undo action.
Click ![]() Previous View to navigate to the previous document view.
Previous View to navigate to the previous document view.
Click ![]() Next View to navigate to the next view. Note that this option is only available when the Previous View option has been used.
Next View to navigate to the next view. Note that this option is only available when the Previous View option has been used.
The Quick Launch and Quick Find toolbars are used to determine the format of the user interface, enable fullscreen mode and find/search document text:
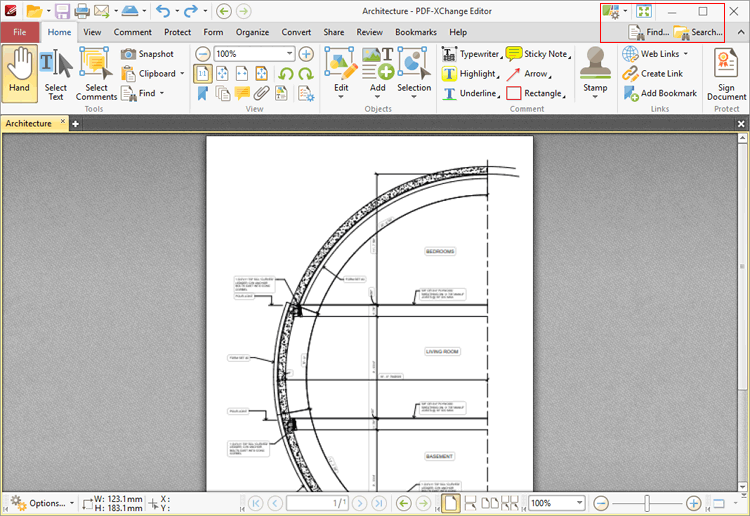
Figure 4. PDF X-Change Editor User Interface, Quick Launch and Quick Find Toolbars Highlighted
Click ![]() UI Options to view/select UI options for PDF-XChange Editor:
UI Options to view/select UI options for PDF-XChange Editor:
•Click Switch to Classic Toolbars to switch to the classic UI layout that PDF-XChange Editor used before version seven. The classic UI version of this manual is available here.
•Click Switch to Touch-optimized UI to switch from Mouse-optimized UI to Touch-Optimized UI and vice versa. The Touch-optimized UI features larger icons and is intended for use in conjunction with tablets, smartphones and similar devices.
•Click Customize Toolbars to customize toolbars, as detailed here.
Click ![]() Full Screen Mode to enable fullscreen mode. Note that fullscreen mode has many customizable features, as detailed here.
Full Screen Mode to enable fullscreen mode. Note that fullscreen mode has many customizable features, as detailed here.
Click ![]() Find to enable the Find feature. This feature locates specified document text, as detailed here.
Find to enable the Find feature. This feature locates specified document text, as detailed here.
Click ![]() Search to open the Search pane and search for text is documents open in PDF-XChange Editor or folders on the local computer, as detailed here.
Search to open the Search pane and search for text is documents open in PDF-XChange Editor or folders on the local computer, as detailed here.
Click the ![]() icon on the right of the Search icon to toggle the document toolbar and/or ribbon tab view.
icon on the right of the Search icon to toggle the document toolbar and/or ribbon tab view.
There are four toolbars in the lower section of the user interface:
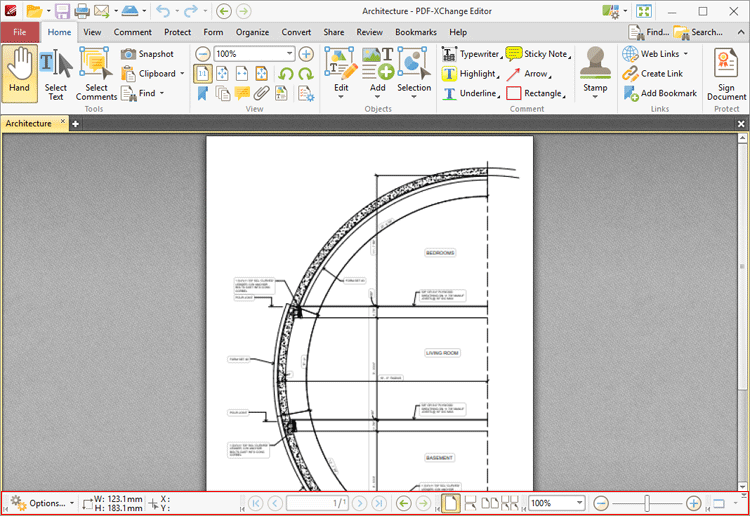
Figure 5. Lower UI Toolbars
The Document Options Toolbar displays the dimensions of the document and the current pointer location:
![]()
Figure 6. Document Options Toolbar
Click Options to open/close the document editing panes and view/select editing tools, as detailed here.
The Page Navigation Toolbar is used to navigate between document pages and views:
![]()
Figure 7. Page Navigation Toolbar
•Click the blue arrow icons to move to the first page, previous page, next page or last page of documents.
•Click the green arrow icons to move between the most recent views within documents.
•The number box at the center shows the current page and the total number of pages in the active document. Enter a page number and press Enter to move to it.
The Page Layout Toolbar is used to determine how pages are displayed in the main window:
![]()
Figure 8. Page Layout Toolbar
•Single Page displays one page at a time.
•Continuous displays single pages continuously.
•Two Pages displays two pages at a time.
•Two Pages Continuous displays two pages continuously.
The Page Zoom toolbar is used to determine the zoom level:
![]()
Figure 9. Page Zoom Toolbar
Enter the desired zoom level and press Enter to move to it, or select an option in the dropdown menu. Alternatively, use the slider to adjust the zoom level manually.
The Launch Application Toolbar is used to open current documents in different applications:
![]()
Figure 10. Launch Application Toolbar
Use the Launch Applications preferences to add applications to the toolbar, then click applications in the toolbar to launch them with the current document open inside.
Note that the arrow icons on the left of toolbars can be used to expand/collapse toolbars, and the grid of dots above the arrow icon can be used to click and drag toolbars to a different location in the user interface.
Additionally, please note that several of the keyboard shortcuts relate to the commands displayed on the user interface. See here for a comprehensive list of available keyboard shortcuts.