 Digital IDs and Signing Documents
A digital ID is an electronic version of your identity. Digital IDs usually contain your name, email address, organization name/unit and country/region, as well as containing a key algorithm and expiration date. Digital signatures utilize a digital ID in order to operate. Digital IDs are used to create digital signatures and to decrypt documents that have been encrypted for the owner. They contain two keys: the public key and the private key. The public key contains the information about its owner, and can be shared by the owner in order for a recipient to encrypt information that is intended for only the owner to view. The public key can also be used to validate the digital signature of the owner, as well as to lock and encrypt documents. The private key is used to create/apply digital signatures, and to decrypt documents that have been encrypted via certificate security. Private keys are used to apply digital signatures when documents are signed. The public key is contained in a certificate that you can distribute to other users, such as those whom you want to be able to validate your signature and identity. It is important to keep your digital ID in a safe location, as it contains your private key, which can be used to decrypt and access your information.
Business transactions often require a digital ID from a certificate authority, which is a trusted third-party provider of digital IDs. If you are selecting a certificate authority to use then it is important to select one that major companies will trust. EU-based providers of digital IDs that can be used worldwide are detailed in the EUTL, which is a list of more than 200 Trust Service Providers (TSPs) that meet high levels of compliance with the EU eIDAS electronic signature regulation. These providers offer certificate-based digital IDs for individuals, digital seals for businesses, and timestamping services that can be used to create a Qualified Electronic Signature (QES) based on digital signature technology. eIDAS is an EU regulation on electronic identification for electronic transactions in the European single market. Further information about eIDAS is available here.
Note that you are not restricted to obtaining a digital ID from the EUTL, and a cursory internet search for digital ID certificate authorities will provide many other options.
You can use PDF-XChange Editor to create a 'self-signed digital ID' that will allow you to record and verify the state of PDF documents when digital signatures are applied, but this does not verify the identity of the person signing the document. If you need to comply with strict legal regulatory requirements then you will need a digital certificate that is provided by a certificate authority, as detailed above.
Creating a Self-Signed Digital ID in PDF-XChange Editor
Follow the steps below to create a self-signed digital ID in PDF-XChange Editor:
1. Click the Protect tab, then click Sign Document:

Figure 1. Protect Tab, Sign Document Highlighted
2. The pointer will change to a pen icon. Click and drag to determine an area in the document. The Sign Document dialog box will open:
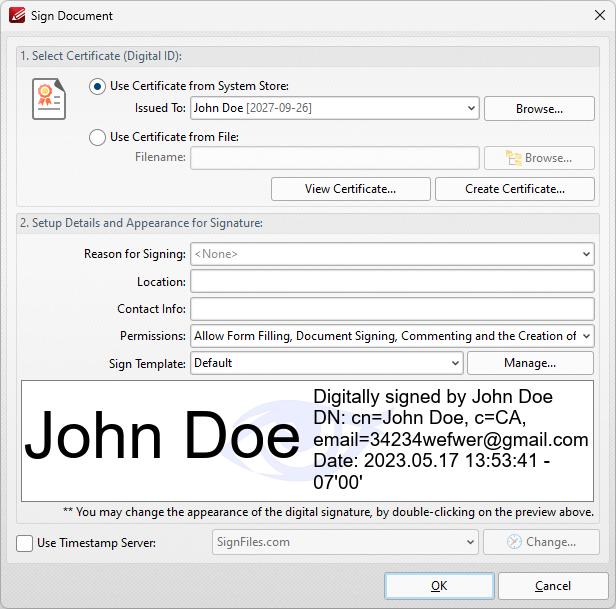
Figure 2. Sign Document Dialog Box
3. Click the Create Certificate button. The Create Self-Signed Digital ID dialog box will open:
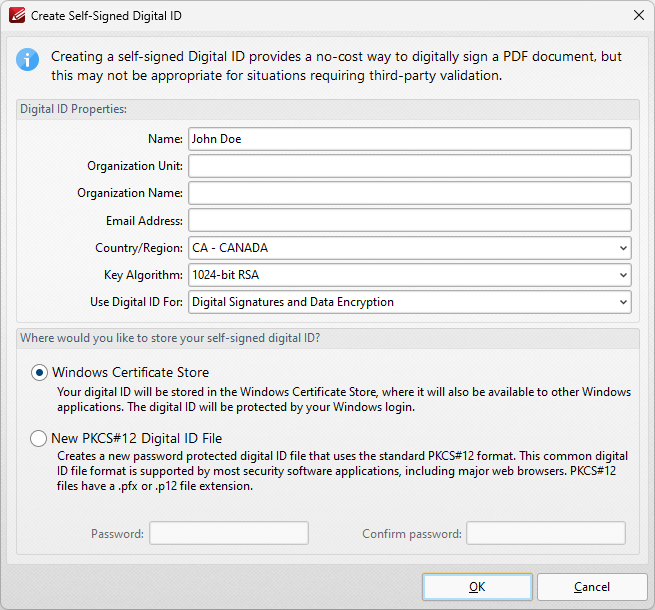
Figure 3. Create Self-Signed Digital ID Dialog Box
•Enter the desired user information in Name, Organization and Email text boxes.
•Use the Country/Region dropdown menu to enter the nationality of the owner of the digital certificate.
•Select either 1024-bit RSA or 2048-bit RSA as the key algorithm. 1024-bit RSA is more universally compatible than 2048-bit RSA, but 2048-bit RSA offers more security.
•Select a storage location for the digital certificate. If the PKCS#12 option is used then enter and confirm a password in the Password text boxes.
Click OK to create the digital certificate. It will then be available in the Use Certificate from System Store dropdown menu detailed in (figure 2).
Signing Documents
Click Sign Document to sign existing signature fields:
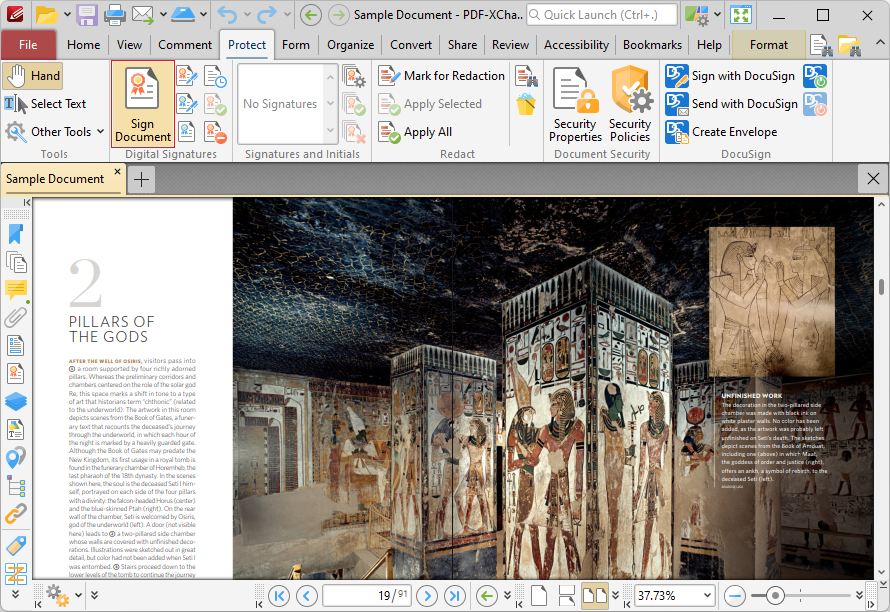
Figure 4. Protect Tab, Sign Document Highlighted
The Sign Document dialog box will open, as detailed below. Note that If more than one signature field is present then it is necessary to select the desired field. If there are no existing signature fields then the pointer will transform into a blue rectangle. This represents a new signature field. Place it at the desired location in the document and then click to create the signature field. The Sign Document dialog box will open:
Figure 5. Sign Document Dialog Box
•Select a certificate from the system store or the local computer.
•Click View Certificate to view details about the selected certificate.
•Click Create Certificate to create a new certificate. The dialog box displayed in (figure 5) will open.
•Click the Reason for Signing menu, or enter text into the box manually, to add a reason for signing the document.
•Click the Location box to enter a location as desired.
•Click the Contact Info box to add contact information to the signature.
•Click the Permissions box to determine the changes that are permitted after the document has been signed.
•Click the Sign Template menu to select layout options for the signature and associated information.
•Click Manage to further customize the Sign Template.
•Select the Use Timestamp Server box to select a timestamp server to add to the signature, then select a timestamp server from the dropdown menu. Click Change to view/edit the details of the timestamp server used.
Click OK to add the digital signature to the document.
Multi-Place Signatures
You can use the Multi-Place Signature option to add digital signatures to multiple pages at the same time:
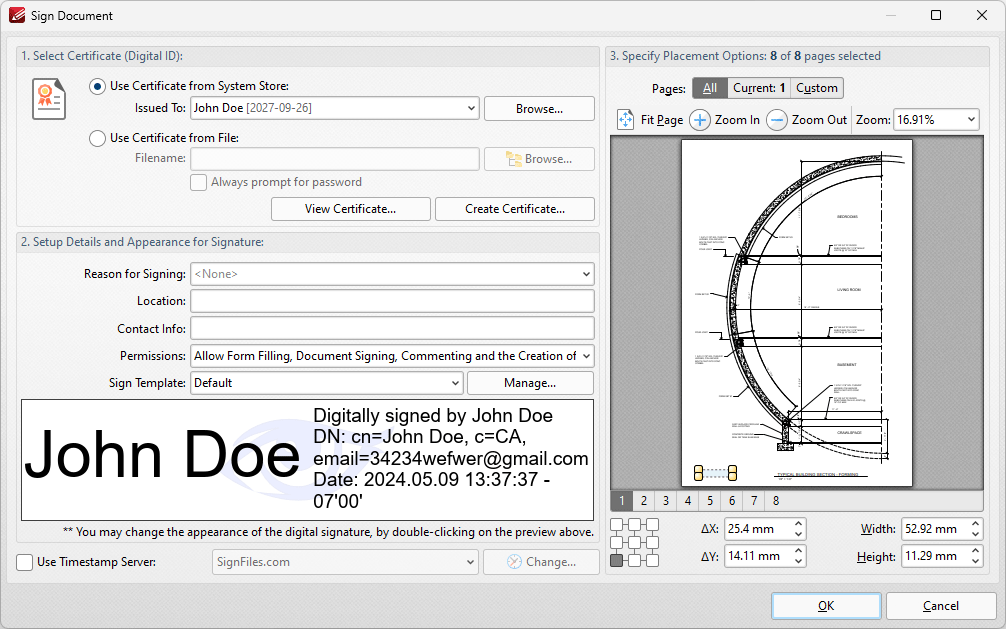
Figure 7. Sign Document Dialog Box
•Select a certificate from the system store or the local computer.
•Click View Certificate to view details about the selected certificate.
•Click Create Certificate to create a new certificate. The dialog box displayed in (figure 3) will open.
•Click the Reason for Signing menu, or enter text into the box manually, to add a reason for signing the document.
•Click the Location box to enter a location as desired.
•Click the Contact Info box to add contact information to the signature.
•Click the Permissions box to determine the changes that are permitted after the document has been signed.
•Click the Sign Template menu to select layout options for the signature and associated information.
•Click Manage to manage/customize/create signature templates. The Digital Signature Appearance Templates dialog box will open, as detailed below.
•Select the Use Timestamp Server box to select a timestamp server to add to the signature, then select a timestamp server from the dropdown menu. Click Change to view/edit the details of the timestamp server used.
•Use the Placement Options to determine where signatures are placed:
•Click All, Current or Custom to determine the pages on which the signature is placed. Page range settings are detailed here.
•Use the Zoom options to change the zoom level in the preview window as desired.
•Click and drag the bounding box, or use the number boxes, to determine the location at which the signature is placed on the page.
Certifying Documents
Click Certify to certify documents and add a visible signature:
Figure 6. Certify Documents Location
The Sign Document dialog box will open, as detailed above. Determine settings as desired and then click OK to certify the document. Note that once a document has been certified with a signature, it is not possible to add another signature to the document. If you want to certify documents without adding a physical signature, then use the Certify (Invisible) option immediately below the Certify option in the user interface.