 Adjusting Page Display and Layout Options
A range of page layout and viewing options are available in PDF-XChange Editor:
Page Layout
The Page Layout Toolbar is used to determine how pages are displayed in the main window:
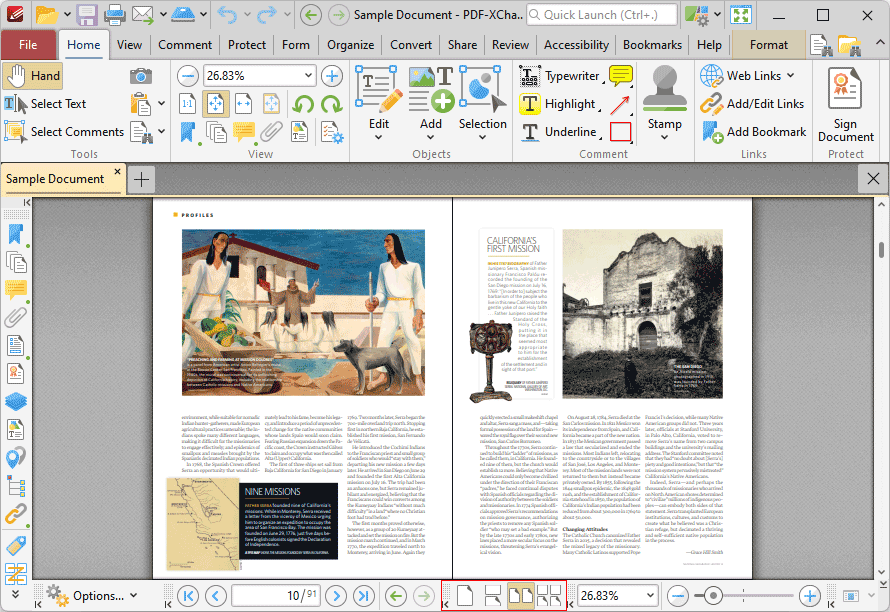
Figure 1. PDF-XChange Editor UI, Home Tab, Page Layout Toolbar Highlighted
•Single Page displays one page at a time.
•Continuous displays single pages continuously.
•Two Pages displays two pages at a time.
•Two Pages Continuous displays two pages continuously.
The Page Zoom toolbar is used to determine the zoom level:
![]()
Figure 2. Page Zoom Toolbar
Enter the desired zoom level and press Enter to move to it, or select an option in the dropdown menu. Alternatively, use the slider to adjust the zoom level manually.
View Tab
The commands in the View tab can also be used to determine page display and zoom options:
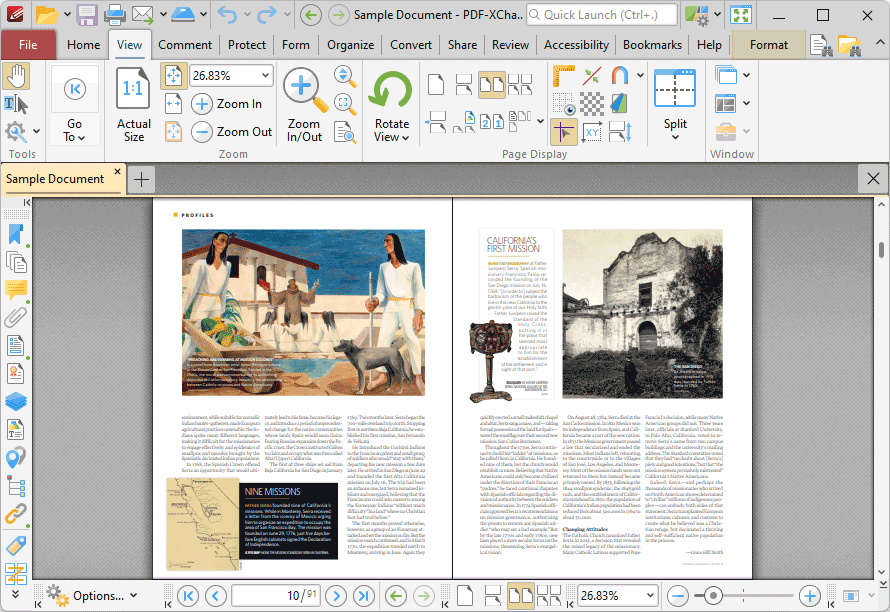
Figure 3. View Tab, Page Display Options
•Click ![]() Actual Size to set the zoom level to 100% and view pages at their actual size.
Actual Size to set the zoom level to 100% and view pages at their actual size.
•Click ![]() Fit Page to fit the page length to the editing space of the user interface.
Fit Page to fit the page length to the editing space of the user interface.
•Click ![]() Fit Width to fit the page width to the editing space of the user interface.
Fit Width to fit the page width to the editing space of the user interface.
•Click ![]() Fit Visible to fit the page width to the editing space of the user interface and ignore white page margins.
Fit Visible to fit the page width to the editing space of the user interface and ignore white page margins.
•Click ![]() Zoom In or
Zoom In or ![]() Zoom Out to zoom in on/out from the active document.
Zoom Out to zoom in on/out from the active document.
•Click ![]() Zoom In/Out Tool to zoom in on/out from the active document. The pointer becomes a magnifying glass icon when this tool is enabled. Move it to the desired location and then click to zoom. Hold down Ctrl and click to zoom out.
Zoom In/Out Tool to zoom in on/out from the active document. The pointer becomes a magnifying glass icon when this tool is enabled. Move it to the desired location and then click to zoom. Hold down Ctrl and click to zoom out.
•Click ![]() Loupe Tool to enable the Loupe Tool, which utilizes a zoom pane that magnifies page portions to assist in document editing. Further information on this tool is available here.
Loupe Tool to enable the Loupe Tool, which utilizes a zoom pane that magnifies page portions to assist in document editing. Further information on this tool is available here.
•Click ![]() Pan and Zoom Tool to enable the Pan and Zoom Tool, which utilizes a zoom pane that enables dynamic page navigation. Further information on this tool is available here.
Pan and Zoom Tool to enable the Pan and Zoom Tool, which utilizes a zoom pane that enables dynamic page navigation. Further information on this tool is available here.
•Click ![]() Rotate View to view rotation options:
Rotate View to view rotation options:
•Click ![]() Rotate CCW to rotate the current view ninety degrees counter-clockwise.
Rotate CCW to rotate the current view ninety degrees counter-clockwise.
•Click ![]() Rotate CW to rotate the current view ninety degrees clockwise.
Rotate CW to rotate the current view ninety degrees clockwise.
Please note that rotations are intended for viewing/editing purposes only and will not be saved. (The Rotate Pages feature can be used to rotate pages permanently).
•Click ![]() Single Page to display documents one page at a time.
Single Page to display documents one page at a time.
•Click ![]() Continuous to display documents one page at a time continuously.
Continuous to display documents one page at a time continuously.
•Click ![]() Two Pages to display documents two pages at a time.
Two Pages to display documents two pages at a time.
•Click ![]() Two Pages Continuous to display documents two pages at a time continuously.
Two Pages Continuous to display documents two pages at a time continuously.
•Click ![]() Show Gaps Between Pages to enable/display the display of gaps between pages.
Show Gaps Between Pages to enable/display the display of gaps between pages.
•Click ![]() Show Cover Page in Two Pages View to include/exclude the first page of documents in Two Pages/Two Pages Continuous layout when these modes are enabled.
Show Cover Page in Two Pages View to include/exclude the first page of documents in Two Pages/Two Pages Continuous layout when these modes are enabled.
•Click ![]() Right-to-Left Page Layout to enable/disable right-to-left page layout when the Two Pages/Two Pages Continuous modes are enabled.
Right-to-Left Page Layout to enable/disable right-to-left page layout when the Two Pages/Two Pages Continuous modes are enabled.
•Click ![]() Page Layout to switch between Standard Layout, which displays pages in top-to-bottom order, and Ribbon Layout, which displays pages in left-to-right order.
Page Layout to switch between Standard Layout, which displays pages in top-to-bottom order, and Ribbon Layout, which displays pages in left-to-right order.
•Click ![]() Show Rulers to show/hide rulers, which can be used to assist in measuring documents and document content. The Rulers feature is detailed here.
Show Rulers to show/hide rulers, which can be used to assist in measuring documents and document content. The Rulers feature is detailed here.
•Click ![]() Thin Lines to enable/disable the Thin Lines feature, which displays all annotation lines at a thickness of one pixel. This is a useful feature in cases where important document content is obscured as a result of multiple annotations/annotations with large borders. Annotation lines are those created using the annotation tools, which are detailed here.
Thin Lines to enable/disable the Thin Lines feature, which displays all annotation lines at a thickness of one pixel. This is a useful feature in cases where important document content is obscured as a result of multiple annotations/annotations with large borders. Annotation lines are those created using the annotation tools, which are detailed here.
•Click ![]() Snap to enable/disable the Snapping feature, which is used to assist in the placement of document content, as detailed here.
Snap to enable/disable the Snapping feature, which is used to assist in the placement of document content, as detailed here.
•Click ![]() Show Grid to enable/disable the editing grid. The editing grid is transposed onto documents and used to ensure that objects are aligned correctly.
Show Grid to enable/disable the editing grid. The editing grid is transposed onto documents and used to ensure that objects are aligned correctly.
•Click ![]() Transparency Grid to enable/disable the transparency grid. A grid is displayed behind transparent objects when this option is enabled.
Transparency Grid to enable/disable the transparency grid. A grid is displayed behind transparent objects when this option is enabled.
•Click ![]() Page Transitions to determine how PDF-XChange Editor transitions between pages when fullscreen mode is enabled. The Page Transition settings are detailed here.
Page Transitions to determine how PDF-XChange Editor transitions between pages when fullscreen mode is enabled. The Page Transition settings are detailed here.
•Click ![]() Show Guides to show/hide guides, which are used in conjunction with rulers to simplify the process of aligning document objects. Click and drag from rulers to launch guides, as detailed here.
Show Guides to show/hide guides, which are used in conjunction with rulers to simplify the process of aligning document objects. Click and drag from rulers to launch guides, as detailed here.
•Click ![]() Show Page Size/Position to show/hide the current page size and pointer location. These details are displayed in the Document Options toolbar, which is in the lower-left section of the user interface.
Show Page Size/Position to show/hide the current page size and pointer location. These details are displayed in the Document Options toolbar, which is in the lower-left section of the user interface.
•Click ![]() Autoscroll to enable/disable autoscroll, which scrolls automatically through documents. The keyboard shortcut to enable/disable autoscroll is Ctrl+Shift+H. Use the up and down arrows to adjust the autoscoll speed, and/or press the minus key to change the autoscroll direction.
Autoscroll to enable/disable autoscroll, which scrolls automatically through documents. The keyboard shortcut to enable/disable autoscroll is Ctrl+Shift+H. Use the up and down arrows to adjust the autoscoll speed, and/or press the minus key to change the autoscroll direction.
•Click ![]() Split to split the current document into two views, which is a useful editing aid. Click the dropdown arrow to select Horizontal Split, Vertical Split or Spreadsheet Split as desired.
Split to split the current document into two views, which is a useful editing aid. Click the dropdown arrow to select Horizontal Split, Vertical Split or Spreadsheet Split as desired.