 Viewing PDFs and Viewing Preferences
When a PDF file is opened, its initial view is determined via the Initial View settings, which the person who created the PDF can determine in the document properties. These settings can be used to force documents to open at a specific page and/or zoom level, as well as with a specific page layout and with editing panes such as the Thumbnails and Bookmarks pane open, amongst other options as detailed here.
View PDFs in Full Screen Mode
When documents are displayed in full screen mode, most of the elements usually displayed in the UI of PDF-XChange Editor are hidden and only the document is visible. Full screen mode can be used for presentations, and it contains an automatic page-scrolling feature and a page transition setting for this purpose.
Click Full Screen Mode (or press F11) to enter full screen mode:
Figure 1. Home Tab, Full Screen Mode Button
Figure 2. Full Screen Enabled
The Page Navigation toolbar is available in fullscreen mode and can be used to navigate between document pages and views:
![]()
Figure 3. Page Navigation Toolbar
•Click the blue arrow icons to move to the first page, previous page, next page or last page of documents.
•Click the plus and minus icons to zoom in/out.
•Click the page layout dropdown arrow to determine the page layout:
•Single Page displays one page at a time.
•Continuous displays single pages continuously.
•Two Pages displays two pages at a time.
•Two Pages Continuous displays two pages continuously.
•The number box at the center shows the current page and the total number of pages in the active document. Enter a page number and press Enter to move to it.
•Click the Exit Full Screen button (or press F11) to exit full screen mode.
Page Display Preferences
The Page Display preferences are used to customize the page display settings of documents:
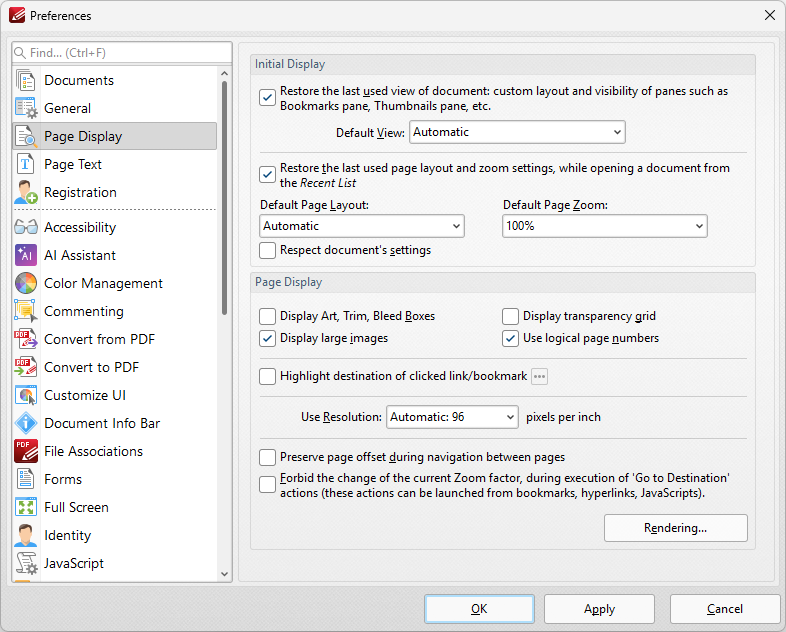
Figure 4. Preferences Dialog Box, Page Display Tab Selected
•The Initial Display settings determine the layout of documents when they are opened:
•Select the upper check box to restore the most recent display settings. Please note that the Crop Pages settings can be used to determine page boxes.
•Use the Default View menu to select the default viewing parameters for documents.
•Select the middle check box to retain the most recently used page layout and zoom settings when recent document are opened.
•Use the Default Page Layout and Default Page Zoom dropdown menus to determine the default layout and zoom settings.
•Select the lower check box to override the settings determined in this section with the existing settings of documents.
•The Page Display settings determine what is displayed on the active page:
•Select the required check boxes. Please note that the Crop Pages feature can be used to define the Art, Trim and Bleed Boxes.
•Select an option from the Use Resolution menu to determine the viewing resolution.
•Select the upper check box to preserve page offsets when navigating between pages. Enabling this feature means that the relative viewing position of a page is maintained when moving between pages.
•Select the lower check box to disable zoom settings when 'Go to Destination' actions are launched.
•Click the Rendering button to determine the rendering settings. The following dialog box will open:
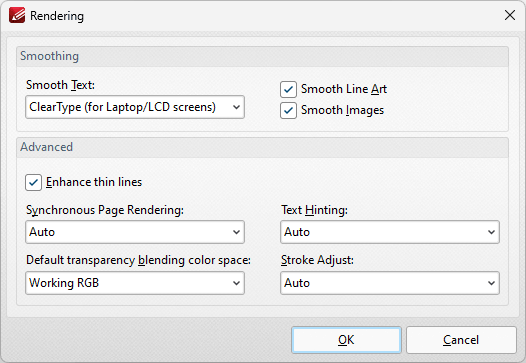
Figure 5. Rendering Dialog Box
•The Smoothing options are used to smooth PDF content and create a softer appearance:
•Select the desired format for smoothing text.
•Select the Smooth Line Art and Smooth Images boxes as desired.
•Please note that some fine detail may be lost as a result of using these options.
•The Advanced options determine advanced display settings for color modes and objects:
•Select the Enhance thin lines box to repair instances of blurring that may occur when using metric measurements such as point (pt).
•Use the Synchronous page rendering menu to define the page rendering method:
•Select No to disable synchronous page rendering. If this option is selected then rendering results are displayed when they are complete. Page scrolling is always smooth when this option is selected, but some pages may be blank initially. This option is best for heavy documents that contain a lot of content, as it ensures that PDF-XChange Editor remains fully responsive at all times.
•Select Yes to enable synchronous page rendering. If this option is selected then the page view in PDF-XChange Editor will wait until the content of all visible pages is rendered before displaying it on the screen. Pages will not be blank initially, but page scrolling will not always be smooth – especially on pages that contain a significant amount of content. This option is best for light documents – for example documentation that contains predominantly text and a small amount of images.
•Select Auto to combine the benefits of synchronous and asynchronous rendering. If the rendering time is small – for example in light documents – then PDF-XChange Editor operates with synchronous rendering enabled. However, if the rendering time exceeds a given threshold, then it will switch to asynchronous rendering. This means that no pages will be displayed as blank initially for light documents, and that page scrolling is always smooth for heavy documents.
•Use the Default transparency blending color space menu to select the default color space for transparency blending:
•Auto uses RGB color when there is no transparency between intersecting objects and CMYK in cases of transparency.
•Working RGB uses only RBG color space.
•Working CMYK uses only CMYK color space and converts it to RGB when displayed on-screen.
•Working Grayscale uses only grayscale when rendering.
•Use the Text Hinting menu to enable/disable text hinting, or set this feature to Auto as desired. Text hinting adjusts the display of outline fonts to make them line up with a rasterized grid.
•Use the Stroke Adjust menu to enable/disable the stroke adjust feature. Stroke adjust specifies that the line widths and coordinates of strokes are adjusted automatically to produce strokes of uniform thickness. This is performed in order to compensate for the effects of rasterization and fit lines (and other figures) more precisely to the pixel grid of monitors and other displays. The width will be as near as possible to the requested line width, and no more than half a pixel in difference. Please note that disabling Smooth Line Art when stroke adjust is enabled will have a negative effect on image quality.
•On forces the use of stroke adjust in all cases.
•Off disables the use of stroke adjust.
•Auto determines the use of stroke adjust according to the content of the file. Note that stroke adjust is not specified in most cases, and the default value is On.
Click OK to save changes.
The Full Screen preferences can be used to determine preferences for full screen mode:
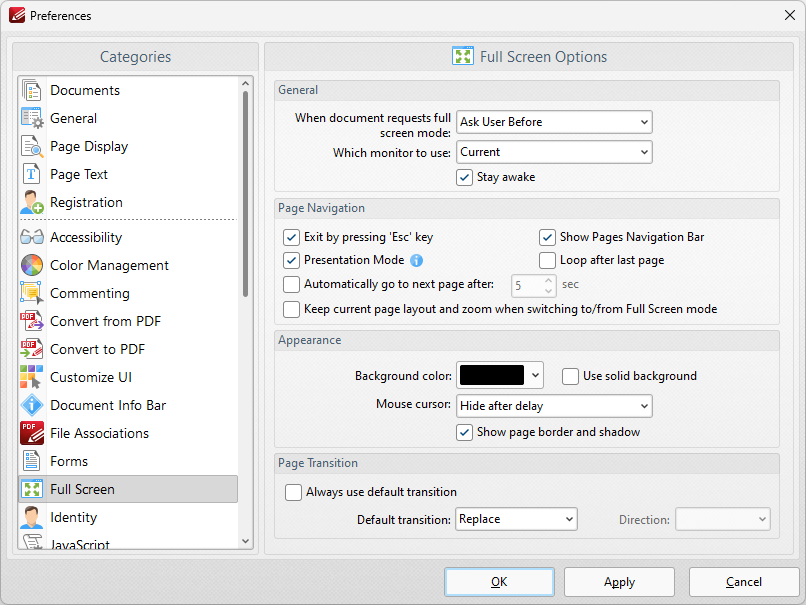
Figure 6. Preferences Dialog Box, Full Screen Tab Selected
•The General settings determine parameters for full screen mode:
•Use the upper dropdown menu to determine what happens when documents request full screen mode.
•Use the lower dropdown menu to determine which monitor is used for full screen mode.
•Select the Stay awake box to prevent the computer from going into screensaver/sleep/hibernate mode.
•The Pages Navigation settings determine navigation parameters for full screen mode:
•Select the Exit by pressing 'Esc' key box to enable the use of the Esc key to exit full screen mode.
•Select the Show Pages Navigation Bar to enable the Page Navigation Toolbar when full screen mode is active.
•Select Presentation Mode to enable Presentation Mode when full screen is enabled. This is a unique mode that is designed for giving presentations. When it is enabled the following settings are active:
•Left-click moves to next page.
•Right-click moves to previous page.
•Press 'B' or 'W' to make the entire screen black or white.
•Press 'P' to pause/resume the automatic scrolling of documents.
•Commenting is disabled.
•Select the Loop after last page box repeat documents when the last page is reached and Presentation Mode is enabled.
•Select the Automatically go to the next page after box to enable the automatic page-browsing feature. Enter a value in number box to determine the rate of browsing.
•Select/clear the Show page border and shadow box as desired.
•The Appearance settings determine further options of the software when full-screen mode is enabled:
•Use the Background color dropdown menu to determine a background color when full screen mode is enabled.
•Select the Use solid background box set a solid background color in full screen mode.
•Select an option from the Mouse Cursor dropdown menu to determine the setting for the mouse cursor in full screen mode.
•The Page Transition settings determine the page transition settings:
•Select the Always use default transition box to use the transition determined in the dropdown menu immediately below.
•Select an option from the Default Transition menu to determine the page transition style in full screen mode.
•Use the Direction dropdown menu to determine the direction of the transition style selected in the Default transition dropdown menu.
Click Apply to apply changes and OK to save changes.
The Documents preferences can be used to determine preferences for documents:
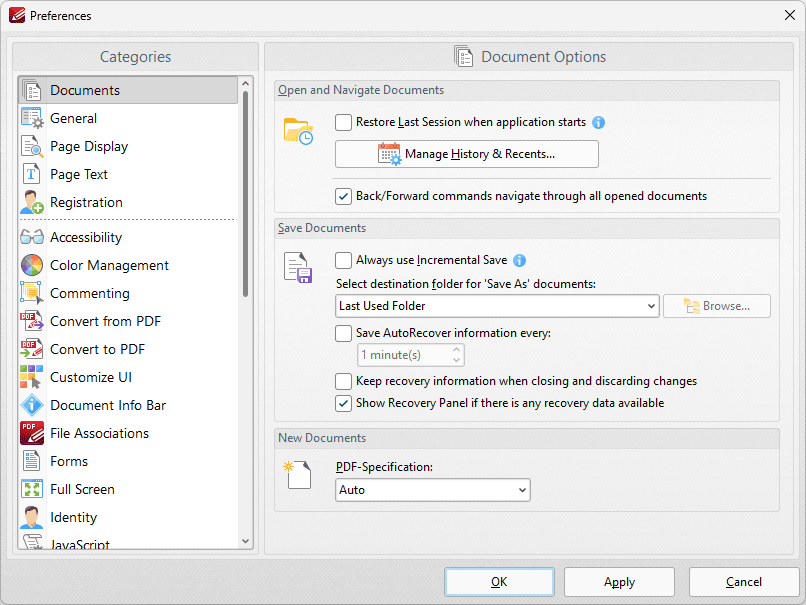
Figure 7. Preferences Dialog Box, Documents Tab Selected
•Select the Restore Last Session when application starts box to restore the most recent session when PDF-XChange Editor is launched.
•Click Manage History and Recents to manage settings for the history of open documents in PDF-XChange Editor. The Manage History and Recents dialog box will open. See (figure 2) below.
•Select the Back/Forward commands navigate through all opened documents dialog box to include all open documents when the back/forward navigation commands are used. If this box is not selected then PDF-XChange Editor will navigate through the views of only the active document when these commands are used.
•Select the Always use Incremental Save dialog box to enable incremental save. PDF-XChange Editor will remember the original content of the document when this option is enabled, and will store information about all new changes. This should reduce the amount of time taken to save files, but please note that the size of files will increase each time a save operation is performed.
•Use the Select destination folder for 'Save As' documents dropdown menu to determine the folder in which documents are saved when the 'Save As' option is used.
•Select the 'Save Autorecover information every' box to enable the saving of autorecovery information, which is useful in the event of software crashes or when documents are closed without changes having been saved. Use the number box to determine the interval at which autorecovery information is saved.
•Select the Keep recovery information when closing and discarding changes box as desired.
•Select the Show Recovery Panel if there is any recovery data available to launch the Document Recovery Panel whenever there is recovery data available.
•Use the PDF-Specification dropdown menu to determine the PDF specification of documents created in PDF-XChange Editor.
Click Apply to apply changes and OK to save changes.
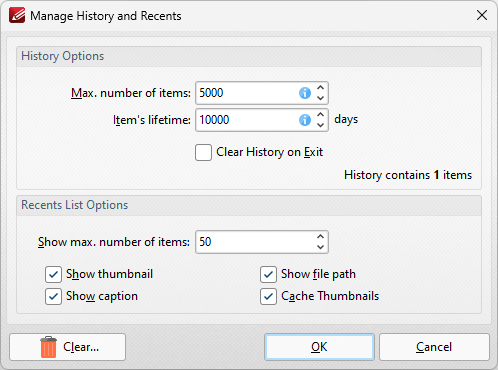
Figure 8. Manage History and Recents Dialog Box
•Use the Max. number of items number box to determine the maximum number of files stored in the history of PDF-XChange Editor.
•Use the Item's lifetime number box to determine the lifetimes of items in the file history list.
•Use the Show max. number of items number box to determine the maximum number of items in the Recents lists.
•Use the check boxes to determine the elements of files that are displayed in the list.
•Click Clear to remove items from the history list.
Click OK to save changes.