 MS Outlook Add-in
The PDF-XChange MS Outlook Add-in installs with PDF-XChange Standard and displays in MS Outlook. It enables the immediate conversion to PDF of emails and bypasses the need for an email client when it is used to archive emails. The PDF-XChange tab is available in the main window of MS Outlook:

Figure 1. MS Outlook Main Window, PDF-XChange Tab
•Click Convert to PDF to convert the current email to PDF.
•Click Convert to PDF Portfolio to convert the current email to a PDF portfolio file.
•Click Settings to determine settings for the MS Outlook Add-in. The PDFXChange Options dialog box will open:
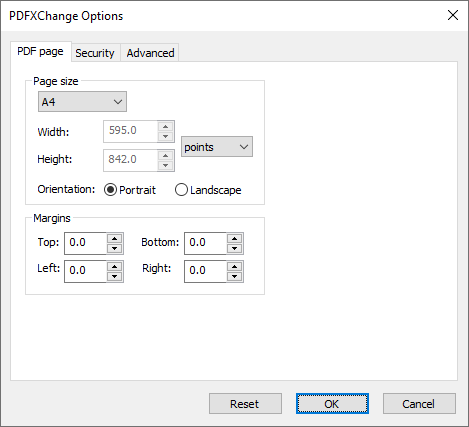
Figure 2. PDFXChange Options Dialog Box, PDF Page Tab
•Use the Page Size dropdown menu to determine the page size of converted emails. Alternatively, use the number boxes and units of measurement dropdown menu to determine custom sizes.
•Select either Portrait or Landscape as the orientation of converted emails.
•Use the Margins number boxes to determine the size of page margins in converted emails.
Click Security to determine security settings:
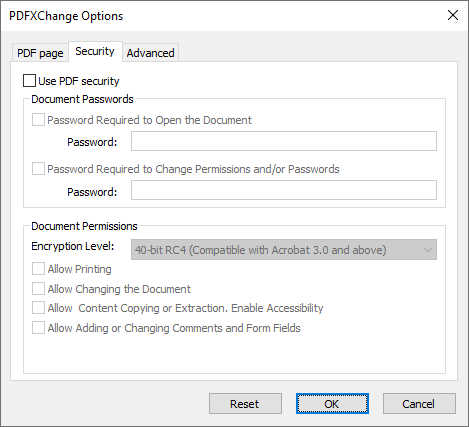
Figure 3. PDF-XChange Options Dialog Box, Security Tab
•Select the Use PDF Security box to enable PDF security.
•Select the Password Required to Open the Document box to set a password for the document, then enter the desired password in the Password text box.
•Select the Password Required to Change Permissions and/or Passwords box to set a password for changing document permissions and/or passwords, then enter the desired password in the Password text box.
•Use the Document Permissions options the encryption level and permissions settings of the document:
•Select the desired level of encryption level in the Encryption Level dropdown menu, then select the check boxes as desired to determine additional settings.
Click Advanced to determine advanced settings for the conversion of emails:

Figure 4. PDFXChange Options Dialog Box, Advanced Tab
•Select the Convert Attachments box to include email attachments in the conversion.
•Use the Web page target width number box to specify the width of the converted web page. Increase/decrease the value to increase/decrease the scale of converted emails.
•Use the Compression level dropdown menu to determine the level of compression for converted emails.
•Use the Conform to Specification dropdown menu to determine the PDF Specification for converted emails.
•Select the Run default application for PDF files after conversion button to launch the default PDF viewer after emails have been converted and view the new documents.
•Select the Application button to specify an alternative application with which to open and view converted emails. Enter the path to the application (for example, PDF-XChange Editor uses the path PDFXEdit.exe by default) in the text box or click Browse to select an application manually.
•Use the Parameters text box to enter additional run parameters for the application specified in the Application text box.
Click OK to save changes.