 Export
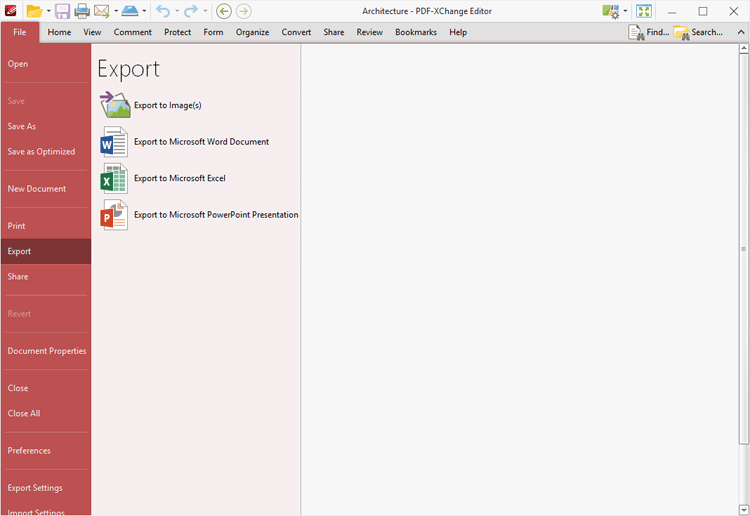
Click Export to export a copy of the current document to a different format:

Figure 1. File Tab Submenu, Export Options
Click Export to Image(s) to export PDF documents into image format. The Export to Image(s) dialog box will open:

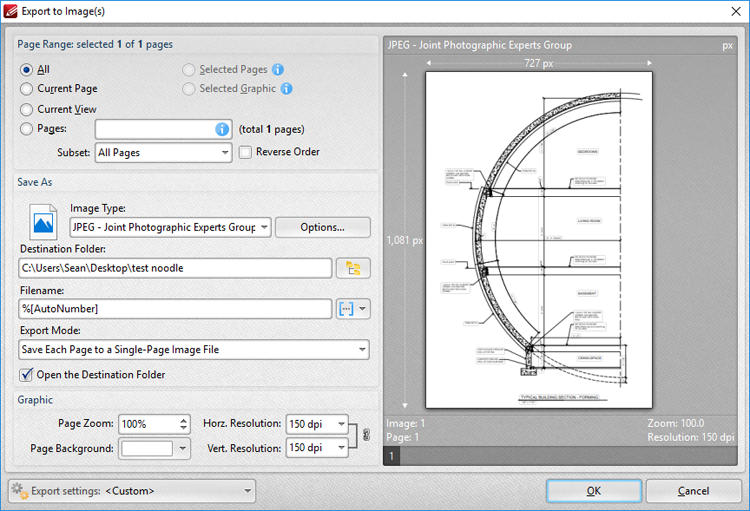
Figure 2. Export to Images Dialog Box
•Use the Page Range options to select the pages that will be exported. The following options are available:
•Click All to export the entire document.
•Click Current Page to export only the page that is currently being viewed.
•Click Current View to export what is currently visible in the PDF viewer.
•Use the Pages option to select specific pages or page ranges. See here for further information.
•Use the Subset option to select either all odd or all even pages of the document.
•Select the Reverse Order box to export pages in reverse numerical order.
•Use the Save As options to determine the file type and location of the saved document:
•Use the Image Type option to determine the image format. Click the Options button to determine further document properties.
•Use the Destination Folder text box to enter the folder in which the document will be saved. Alternatively, click the adjacent icon to browse the folders on the local computer.
•Use the Filename text box to enter a file name for the new document. Add macros as desired - enter them after the file name or click the adjacent icon.
•Use the Export Mode setting to select the mode in which multiple-page documents are exported. There are three options:
•Save all pages to a single multi page image file.
•Save each page range to a multi page image file.
•Save each page to a separate single page image file.
•The Open the Desintation Folder box is selected by default. Clear this box to disable this function.
•Use the Graphic options to determine the graphics settings:
•Page Zoom increases or decreases image dimensions.
•The Resolution boxes determine the horizontal and vertical resolution of images. The ratio is constrained by default. Click the chain icon to disable this setting.
•The Page Background setting determines the color of the background in the new document.
When custom export options have been selected they can be saved using the Export Settings menu. Click Save to save the current settings. Enter a name (and brief description, if desired) for the settings. Click Manage to edit customized settings and Delete to remove the setting currently selected.
Click Export to Microsoft Word Document to export the project into (*.docx) format, which is intended for use with Microsoft Word. The Save File dialog box will open and the file name will be added in (*.docx) format automatically.
Click Export to Microsoft Excel to export documents into (*.xlsx) format, which is intended for use with Microsoft Excel. The Save File dialog box will open and the file name will be added in (*.xlsx) format automatically.
Click Export to Microsoft Powerpoint Presentation to export documents into (*.pptx) format, which is intended for use with Microsoft Powerpoint. The Save File dialog box will open and the file name will be added in (*.pptx) format automatically.
Please note that Microsoft Office must be installed on the local computer for these features to operate.